Pages

Showing posts with label Technical chamber. Show all posts

Plugins and Presets for Vuejs project

 Read our previous blogs to create Vue project with CLI Services. In this article, we have included plugins and presets for Vuejs project in order to create Vue CL project more extensible and flexible. Here you will understand how to use plugins and presets to optimize your project. 

Plugins

The best part of Vue CLI project is that it uses plugin-based architecture. When you inspect a new project package.json, you will see that the dependencies start with @vue/cli-plugin-. Plugins help you to modify the configuration of the internal webpack and add commands to vue-cli-service. You can see many features listed during the process of project creation are implemented as plugins. 


You can take help from Plugin Development Guide and get more information related to developing a plugin.  

Instal plugins in an existing project

Each CLI plugin is correlated with a generator (responsible to create files) plus a runtime plugin (which improves the core webpack config and adds commands). Now if you use vue create in order to create a new Vue project, some of the plugins will be preinstalled on your system according to the feature selection. 


If you want to install a plugin on an already existing project, use vue add command. 


vue add eslint


Note: The vue add command is designed especially for installing and adding Vue CLI plugins. This plugin is not created to replace the normal npm packages. To use normal npm packages, you need to use your package manager of choice. 


Use @vue/eslint command to resolve the full package name @vue/cli-plugin-eslint, install this package from npm and call its generator:


# these are equivalent to the previous usage

vue add cli-plugin-eslint


If you don’t use use @vue prefix, it will resolved unscoped package instead. For install, use this prefix to install the third party plugin vue-cli-plugin-apollo:


# installs and invokes vue-cli-plugin-apollo

vue add apollo


This third-party plugin can also work under a specific scope. For instance, if you are using plugin name @foo/vue-cli-plugin-bar, you can add this plugin with:


vue add @foo/bar


Pass the generator to the already installed plugin (you don’t have to provide prompts)


vue add eslint --config airbnb --lintOn save


In case the plugin is already installed, just skip the installation and call its generator along with the vue invoke command. The command complies with the same prompts as vue add. 

Project local plugin

These plugins will help you create Vue app more relevant and flexible. In case you don’t want to create a new plugin and need access to plugin API for your project, you can conveniently use the option vuePlugins.service in your package file: 


{

  "vuePlugins": {

    "service": ["my-commands.js"]

  }

}


Taking plugin API as first argument and enable each file to export a function. You can get more information on plugin API in Plugin Development Guide. 


Additionally, you can add more files that will act as a UI plugin with the vuePlugins.ui option. 


{

  "vuePlugins": {

    "ui": ["my-ui.js"]

  }

}

Presets

In order to save the user from having to go through the prompts to choose parameters and plugins, Vue CLI presets are JSON objects that include pre-defined options and plugins for starting a new project.


The configuration file located in your user home directory (/.vuerc) contains presets that were saved during vue create. This file can be directly edited to modify, add, or remove the saved presets.


Here is a prepared illustration:


{

  "useConfigFiles": true,

  "cssPreprocessor": "sass",

  "plugins": {

    "@vue/cli-plugin-babel": {},

    "@vue/cli-plugin-eslint": {

      "config": "airbnb",

      "lintOn": ["save", "commit"]

    },

    "@vue/cli-plugin-router": {},

    "@vue/cli-plugin-vuex": {}

  }

}


Plugin generators create the necessary project files using the predefined data. You can provide additional configuration for integrated tools in addition to the fields mentioned above:


{

  "useConfigFiles": true,

  "plugins": {...},

  "configs": {

    "vue": {...},

    "postcss": {...},

    "eslintConfig": {...},

    "jest": {...}

  }

}


Depending on the option of useConfigFiles, these extra configurations will either be merged into package.json or the relevant config files. For instance, the value of configs.vue will be merged into vue.config.js when "useConfigFiles" is set to true.

Preset Plugin Versioning

You can specify versions of the plugins that are used:


{

  "plugins": {

    "@vue/cli-plugin-eslint": {

      "version": "^3.0.0",

      // ... other options for this plugin

    }

  }

}


Remember that this is not needed for official plugins and when these plugins are omitted, the CLI will automatically use the current version available in registry section. 


Allow Plugin Prompts

Each plugin has the ability to inject its own prompts into the project setup process, but when you use a preset, Vue CLI believes that all of the plugin parameters have already been stated in the preset.


In other circumstances, you might want the preset to simply declare the desired plugins while still giving the user some latitude by letting them respond to the plugin-injected questions.


You can provide "prompts" for such instances by saying: true in a plugin's settings to permit the injection of its prompts:


{

  "plugins": {

    "@vue/cli-plugin-eslint": {

      // let the users pick their own ESLint config

      "prompts": true

    }

  }

}

CRUD Operations In ASP.NET Core Using Entity Framework Core Code First with Angularjs

 Create a folder named Model.


Create a class name TblCustomer inside model folder and write the property.

Make Id as primary key and auto generated.

using System;
using System.ComponentModel.DataAnnotations;
using System.ComponentModel.DataAnnotations.Schema;

namespace WebApiCoreLecture.Model
{
    public class TblCustomer
    {
        [Key]
        [DatabaseGenerated(DatabaseGeneratedOption.Identity)]
        public int Id { get; set; }
        [StringLength(150)]
        public string Name { get; set; }
        [StringLength(150)]
        public string LastName { get; set; }
        [StringLength(250)]
        public string Email { get; set; }
        public int Age { get; set; }
        public string Gender { get; set; }
        public int IsActive { get; set; }
      
    }
}

Now, create a context class inside model folder name Customer. Inherit the class with the DbContext which is class of entity framework. Then make a constructor using dependency injection and initialise the DbContext class. Also, make a database set property of the created model class.


using Microsoft.EntityFrameworkCore;


namespace WebApiCoreLecture.Model

{

    public class CustomerContext : DbContext

    {

        public CustomerContext(DbContextOptions<CustomerContext> options) : base(options)

        {

        }

        public DbSet<TblCustomer> Customer { get; set; }

    }

}


Now, We need to create a connection string and name the database "AngularAppDb". It will create database with the name "AngularAppDb". 


{
  "Logging": {
    "LogLevel": {
      "Default": "Information",
      "Microsoft": "Warning",
      "Microsoft.Hosting.Lifetime": "Information"
    }
  },
  "ConnectionStrings": {
    "ConEmp": "Server=DESKTOP-HBLN74L\\SQLEXPRESS; Database=AngularAppDb; Trusted_Connection=True;"
  },
  "AllowedHosts": "*"
}


Now, we need to add the following line in the startup file in ConfigureServices .

services.AddDbContext<CustomerContext>(db => db.UseSqlServer(Configuration.GetConnectionString("ConEmp")));


We need to make controller with name Customer.


using Microsoft.AspNetCore.Cors;
using Microsoft.AspNetCore.Http;
using Microsoft.AspNetCore.Mvc;
using Microsoft.AspNetCore.Mvc.ModelBinding;
using Microsoft.EntityFrameworkCore;
using System;
using System.Collections.Generic;
using System.Linq;
using System.Threading.Tasks;
using WebApiCoreLecture.Model;
using WebApiCoreLecture.Model.ResponseModel;

namespace WebApiCoreLecture.Controllers
{
    [Route("api/[controller]/[action]")]
    [ApiController]
    [EnableCors("AllowOrigin")]
    public class CustomerController : ControllerBase
    {
        private readonly CustomerContext _context;
        public CustomerController(CustomerContext context)
        {
            _context = context;
        }


        [HttpGet]
        public async Task<ActionResult<IEnumerable<TblCustomer>>> TblCustomer()
        {
            ResponseModels Response = new ResponseModels();

            return await _context.Customer.ToListAsync();
            Response.Code = 200;
            Response.Message = "Showing list of customer";
        }

        [HttpPost]
        public async Task<ActionResult<TblCustomer>> PostCustomer(TblCustomer model)
        {
            ResponseModels response = new ResponseModels();
            try
            {
                
                
                    TblCustomer cus = new TblCustomer();
                    cus.Name = model.Name;
                    cus.LastName = model.LastName;
                    cus.Email = model.Email;
                    cus.Age = model.Age;
                    cus.Gender = model.Gender;
                    _context.Customer.Add(cus);
                    _context.SaveChanges();
                    response.Code = 200;
                    response.Message = "Succesfully Inserted";
                
                
            }
            catch (Exception e)
            {
                response.Code = 400;
                response.Message = "Something went wrong";
            }
            return Ok(response);
        }

        [HttpDelete("{Id}")]
        public async Task<ActionResult<TblCustomer>> DeleteCustomer(int id)
        {
            ResponseModels response = new ResponseModels();
            try
            {
                var deletion = await _context.Customer.Where(x => x.Id == id).FirstOrDefaultAsync();
                if(deletion!= null)
                {
                    _context.Customer.Remove(deletion);
                    _context.SaveChanges();
                    response.Code = 200;
                    response.Message = "Successfully Deleted";
                }
                else
                {
                    response.Code = 400;
                    response.Message = "Something went wrong";
                }
            }
            catch (Exception e)
            {
                response.Code = 400;
                response.Message = "Something went wrong";
            }
            return Ok(Response);
        }

        [HttpPost]
        public async Task<ActionResult> UpdateCus(CusModel model)
        {
            ResponseModels response = new ResponseModels();
            try
            {
                var updateCustomer = await _context.Customer.Where(x => x.Email == model.Email).FirstOrDefaultAsync();
                if (updateCustomer == null)
                {
                    response.Code = 400;
                    response.Message = "User not found!!";
                    return Ok(response);
                }

                updateCustomer.Name = model.Name;
                updateCustomer.LastName = model.LastName;
                updateCustomer.Age = model.Age;
                updateCustomer.Gender = model.Gender;
               
                _context.Update(updateCustomer);
                if (_context.SaveChanges() > 0)
                {
                    response.Code = 200;
                    response.Message = "Record Update Successfully.";
                }

            }
            catch (Exception ex)
            {
                response.Code = 400;
                response.Message = ex.Message;
            }
            return Ok(response);
        }
    }
}


Now, we need to migrate and update database.

Go to Tools > NuGet Package Manager > NuGet Package Console

Type the following command to migrate-
 add-migration anyname

After migration, we need to update database using following command-
update-database

Now, open the sql server management system, all we can see here our created database


 After expanding the table of AngularAppDb, we can see the table name Customer


Our Api is working on different port or localhost and our Angular project is running on different port.
We can also say it cross origin. The communication between two different port can be happen directly.
To make it happen, we need to allow it from api. So, we need to add CORS in our startup file inside ConfigureServices.


 services.AddCors(o => o.AddPolicy("AllowOrigin", builder =>
            {
                builder.AllowAnyHeader()
                      .AllowAnyMethod()
                      .SetIsOriginAllowed((host) => true)
                      .AllowCredentials();
            }));

and also add the following line after routing in Configure method in startup file.

app.UseCors("AllowOrigin");


5 easy ways to repair the .NET Framework on Windows

A functional .NET Framework is important to build and run your application on your PC. If your framework is broken then don’t worry because Microsoft provides a dedicated repair tool for NET Framework. Mircosoft’s dedicated repair tool can fix any problem related to .NET Framework and enable you to run your application again. 


In case the Microsoft repair tool does not work, there are other workarounds that you can try and fix the errors in the framework. In this article, we have explained the process to fix the .NET Framework on Windows in simple 5 ways. 

Step 1: Run your repair tool

                                                 Source: makeuseof.com


The best and simple way to repair your .NET Framework is by using the official Microsoft repair tool. You can find this tool on its official website plus you can also check common problems related to Dot NET Framework with this repair tool. You just need to follow the simple steps and recommendations to fix the problem.  


The following points will help you run the framework repair tool.

  • Visit the .NET Framework Repair Tool

  • Scroll down your cursor to the Download information section. 

  • Now, press Microsoft .NET Framework Repair Tool.

  • Once you have downloaded the tool, double-click on the Netfxrepairtool.exe in order to run the repair tool. Click on the ‘Yes’ option in case User Account Control has prompted. 

  • Accept all the conditions and click on the ‘Next’ button. 

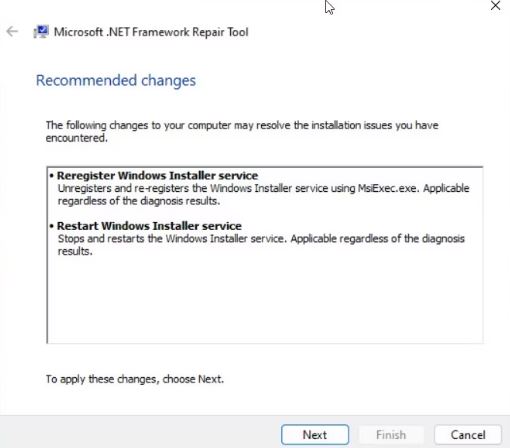
  • The .NET Framework repair tool will take a while to detect the problem in your framework. Once the process is finished, it will suggest some changes. Read the description and then click on the ‘Next’ button to apply the changes.

  • Once the changes are done, click on ‘Next’ to close the repair tool.  

Step 2: Repair .NET Framework through Optional Features

In case the first step is not working and you are facing some serious problems in your Microsoft .NET Framework you can follow this step. You can disable the repair tool and re-enable some features from the Optional Features in order to repair the framework. This process will help you disable and then re-enable the tool fixing any problem due to file corruption and temporary glitches. 


  • The below points will help you disable and re-enable optional features on Windows.

  • Click Win+R and open Run.

  • Enter ‘control’ and click on the ‘OK’ option and open Control Panel. 

  • Now, press on ‘Program’ and then press on ‘Program and Features.’    

  • Press on the ‘Turn Windows features On or Off’ option present in the left pane. 

                                                      Source: makeuseof.com


  • Next, uncheck the box .NET Framework 4.8 Advanced Services option. 

  • Click on the ‘OK’ button. 

                                                    Source: makeuseof.com


The .NET Framework will be disabled from your PC and will show the message ‘Windows completed the request changes’ message. Click on the ‘Restart Now’ button to apply the changes. 


After the restart process:

  • Click on the Control Panel and then ‘Turn Windows Features On and Off.’ 

  • Choose both the .NET Framework 4.8 Advance Services and .NET Framework 3.5 options. 

  • Click on the OK button. 

                                               Source: makeuseof.com


After that, press ‘Let Windows update downloads the files for you.’ This process might take a while, depending on your internet speed. 

                                                Source: makeuseof.com

Step 3: Repair .NET Framework using PowerShell

If the problem is still there, try the reinstallation. NET Framework utilizing PowerShell on your Windows computer. The.NET Framework and other related tools can be installed completely via the shell application. 


Click the Win key and type PowerShell.

Then, right-click on PowerShell and choose Run as administrator. 

Next, in the PowerShell window, enter the below-given cmdlet and click Enter. 


Get-Package -Name &ldquo;Microsoft .Net*&rdquo; | Uninstall-Package


You might be asked to install ‘NuGet’, a packet manager which is important to perform this action. Enter ‘Y’ and click on ‘Enter.’ 


PowerShell will uninstall the .NET Framework from your system. 

                                                  Source: makeuseof.com


  • To install the most recent version of the Microsoft.NET Framework, use the following command. 


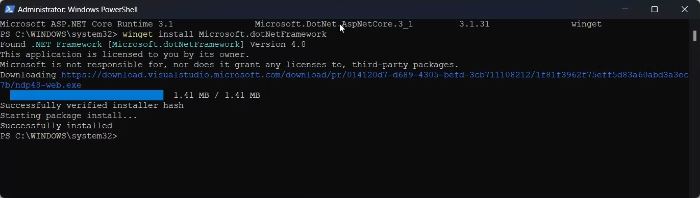
winget install Microsoft.dotNetFramework


  • PowerShell will download and extract the package. Once it is finished, a notice indicating that the installation was successful will appear.

  • To implement the modifications and look for any improvements, restart your computer.

Step 4: Manually install an older version of the .NET Framework

With PowerShell, you can only install the most recent version of the .NET Framework. But occasionally a program might need an older version of the.NET Framework to function. If the Optional Features dialogue reinstalling didn't work, you may manually install the.NET Framework from the download page.


Follow the below points to manually install the older .NET Framework versions.

  • Visit the .NET Framework download page.

  • In the ‘Supported versions’ option, press the .NET Framework version you want to download.

  • Go to the next page and press the ‘Download .NET Framework XX Runtime.’ 

  •  After downloading, go to the download location and run the ‘dotnetfx.exe’ file in order to launch the setup. Click on the ‘Yes’ option, if prompted by UAC. 

  • After that, follow the instructions in order to complete the setup. 

  • Restart your system and then install the app and check whether it is working or not. 

Step 5: Run the System File Checker Tool

                                               Source: makeuseof.com


An integrated system repair tool called System File Checker locates and corrects missing or damaged system files. The program can be used to resolve any system problems that might be.NET Framework-related.


The following points will help you run the System File Checker Tool.

Click on ‘Win’ and type ‘cmd.’

Right-click on the Command Prompt option and choose ‘Run as administrator.’

Type the following command into the Command Prompt window:


DISM.exe /Online /Cleanup-image /Restorehealth


  • It is advised to perform the DISM command mentioned above before using the System File Checker utility since it will supply the files needed to repair system file damage.

  • Run the subsequent command after it has finished, then press Enter.


sfc /scannow


Once your system files have been scanned for problems, the SFC utility will replace any damaged files as necessary. Hold off until the verification procedure is finished.


Make new Model/Controller/Migration in Laravel

  In this article, we have included steps to create a model and controller or resource controller with the help of command line(CLI). Here w...