Flutter web has been in the market for quite some time and it has made its place strongly among developers. The Flutter framework is said to be one of the most effective and efficient frameworks out there to build an attractive and responsive website with Flutter. The best part about this framework is that it gets updated once in a while which makes it more approachable and productive for the developers.
Flutter 2 is a new version of Flutter with more plugins and improvements, so if you still haven’t tried your hands then you must do it. In this article, we have discussed a responsive app and built a project in Flutter. Read this article to get the best Flutter web tutorial and build a basic website in Flutter.
What is responsive website design with Flutter?
In layman’s terms, a responsive UI web app in Flutter allows you to perform an activity on the application without any problem. The development team creates end-to-end responsive websites for the users. A responsive website means the size of the website can adjust to the screen size with fluidity and ease.
The single-code use makes Flutter a popular framework to develop custom software for various sectors. For people who pay attention to design and presentations, Flutter makes a good tool to make a website attractive and responsive UI.
Getting started with code
In this project, we will use Flutter 2.0 for building and configuring an application to run on the web by default.
First, create a new project by using the below command:
flutter create explore
explore- It is the name of the Flutter website project that we will create.
Once created a project, open it by using IDE you want. To open this, use the below-given command:
code explore
If you are not using Flutter 2.0 then you need to enable web support.
flutter config --enable-web
Now you can run your project for a browser. In order to see whether your env is set up properly.
flutter devices
Let’s get to the creation. Use the create command for the Flutter app.
flutter create the_basics
Building a basic UI
The UI that we have included in this article is for the landing page given below. You will get the code for the set of series used on the landing page. Flutter is considered one of the best frameworks to build easy responsive UI web apps.

Now, the above landing page can be created with a basic UI layout web view. Nothing is special about the landing page. Open the_basic project in your favorite IDE (here we will use VS code). The first step into this is clearing out the main file and putting the scaffold body as the HomePage.
class MyApp extends StatelessWidget {
@override
Widget build(BuildContext context) {
return MaterialApp(
title: 'Flutter App',
theme: ThemeData(
primarySwatch: Colors.blue,
),
home: HomePage()
);
}
}
After this, create a new folder named page under the lib folder and inside the first folder create a new folder named home, and inside that folder create a new field named home_page.dart
class HomePage extends StatelessWidget {
const HomePage({Key key}) : super(key: key);
@override
Widget build(BuildContext context) {
return Scaffold();
}
}
The HomePage will be divided into the following three sections.
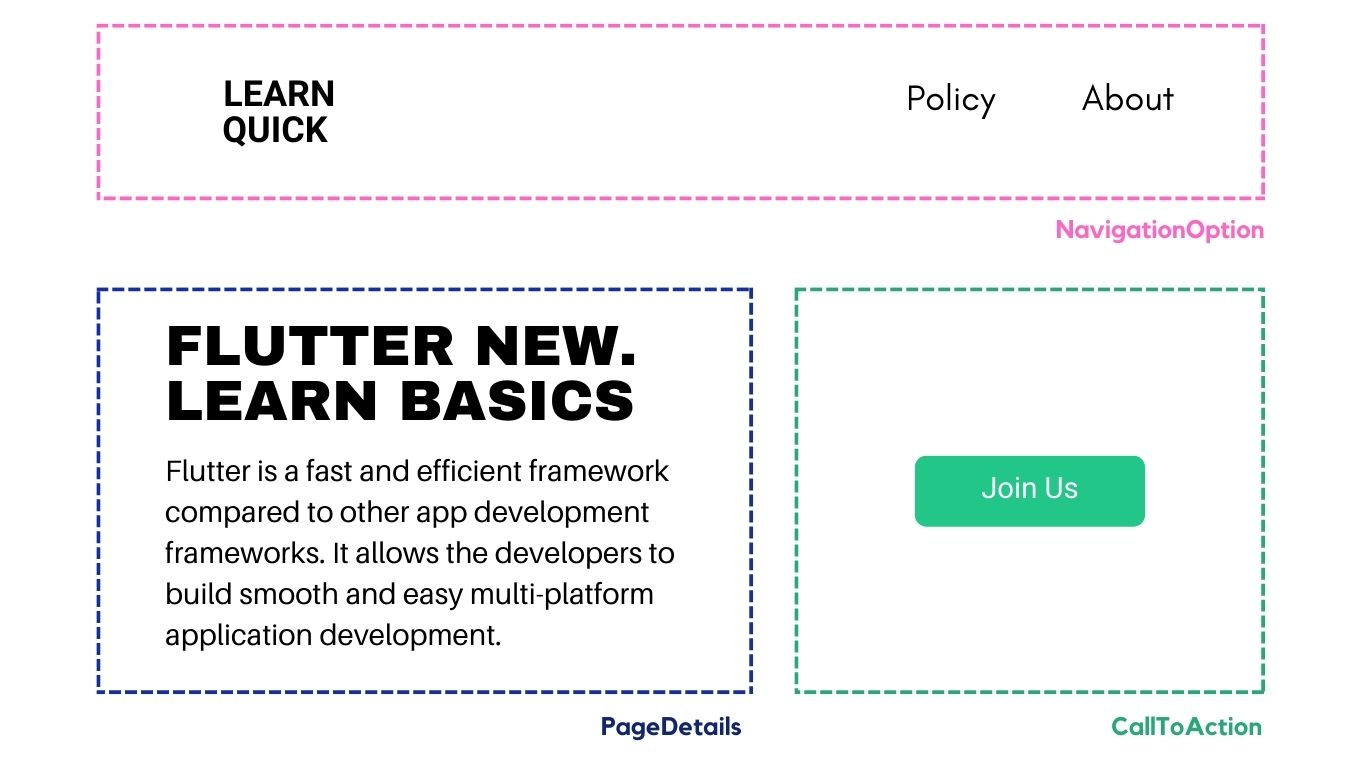
Navigation Option
Now, it's time to build a UI and create a new folder of widgets in the lib folder. Under this folder create a new folder named as NavigationOption and inside it create a new file navigation_option.dart. This Flutter code example will help you build a basic responsive web application.
class NavigationOption extends StatelessWidget {
@override
Widget build(BuildContext context) {
return Container(
height: 100,
child: Row(
mainAxisAlignment: MainAxisAlignment.spaceBetween,
children: <Widget>[
SizedBox(
height: 80,
width: 150,
child: Image.asset('assets/logo.png'),
),
Row(
mainAxisSize: MainAxisSize.min,
children: <Widget>[
_NavBarItem('Policy'),
SizedBox(
width: 60,
),
_NavBarItem('About'),
],
)
],
),
);
}
}
class _NavBarItem extends StatelessWidget {
final String title;
const _NavBarItem(
this.title, {
Key key,
}) : super(key: key);
@override
Widget build(BuildContext context) {
return Text(
title,
style: TextStyle(fontSize: 18),
);
}
}
Add an image to Flutter
Find the logo and images here and download the one you like and create a new folder in the root named image. Put the logo.png in the folder. Navigate to the pubspec.yaml file and place it as an image.
assets:
- assets/logo.png
Add a custom Font
Now, the last thing we are required to change here to match it with our landing page is the Font of NavItems. The font that we downloaded above for the logo-named image is in the zip file, we need to move it to another folder named fonts. Open the pubspec.yaml file and place it as a font with the set weights for two fonts.
fonts:
- family: Open Sans
fonts:
- asset: assets/fonts/OpenSans-ExtraBold.ttf
weight: 800
- asset: assets/fonts/OpenSans-Regular.ttf
weight: 400
We need to set the font for the entire website and set the textTheme of the website in the main-dart file.
class MyApp extends StatelessWidget {
@override
Widget build(BuildContext context) {
return MaterialApp(
title: 'Flutter App',
theme: ThemeData(
primarySwatch: Colors.blue,
textTheme: Theme.of(context).textTheme.apply(
fontFamily: 'Open Sans',
)),
home: HomePage());
}
}
Lastly, we need to add the NavigationOption to the HomePage UI and that’s it.
class HomePage extends StatelessWidget {
const HomePage({Key key}) : super(key: key);
@override
Widget build(BuildContext context) {
return Scaffold(
backgroundColor: Colors.white,
body: Column(children: <Widget>[
NavigationOption()
],),
);
}
}
When you run the code you can see that the navigation bar is written at the top. The content on the website must not go edge to edge. It should be aligned in the middle of the website properly so to make it readable. In order to do that we need to create another widget with a new folder named cenetered_page. Inside this folder create a new file named as centered_page.dart.
class CenteredPage extends StatelessWidget {
final Widget child;
const CenteredPage({Key key, this.child}) : super(key: key);
@override
Widget build(BuildContext context) {
return Container(
padding: const EdgeInsets.symmetric(horizontal: 70.0, vertical: 60),
alignment: Alignment.topCenter,
child: ConstrainedBox(
constraints: BoxConstraints(maxWidth: 1200),
child: child,
),
);
}
}
The maximum width of the page will not stretch more than 1200. You can pass the length to modify per view. Right now we are skipping this part.
Now, wrap the home_page with the file CenteredPage.
class HomePage extends StatelessWidget {
...
@override
Widget build(BuildContext context) {
return Scaffold(
backgroundColor: Colors.white,
body: CentredPage(
child: Column(
children: <Widget>[
NavigationOption(),
],
),
),
);
}
}
The header of the website must look like the one below the given image with spacing on the side.

Page Details
Now it's time to build a course details widget which will be presented on the left side of the website. The font used here will be the one used before and the font weight will be at least 800. Create a new folder under widgets with the name page_details and inside this folder create a new file name page_details.dart.
class PageDetails extends StatelessWidget {
const PageDetails({Key key}) : super(key: key);
@override
Widget build(BuildContext context) {
return Container(
width: 600,
child: Column(
crossAxisAlignment: CrossAxisAlignment.start,
mainAxisAlignment: MainAxisAlignment.center,
children: <Widget>[
Text(
'FLUTTER NEW.\nLEARN BASICS',
style: TextStyle(
fontWeight: FontWeight.w800, fontSize: 80, height: 0.9),
),
SizedBox(
height: 30,
),
Text(
'Flutter is a fast and efficient framework compared to other app development frameworks. It allows the developers to build smooth and easy multi-platform application development.',
style: TextStyle(fontSize: 21, height: 1.7),
),
],
),
);
}
}
Now, it's time to add this widget to the HomePage in an Expanded child, as the first widget item of a row. Update the home_page and build a method to look like this.
Widget build(BuildContext context) {
return Scaffold(
backgroundColor: Colors.white,
body: CentredPage(
child: Column(
children: <Widget>[
NavigationOption(),
Expanded(
child: Row(children: [
PageDetails(),
]),
)
],
),
),
);
}
Now when you save the page it would look like the below image.

Finally, we will use a call to action button for Join Us. Create a call_to_action folder under widgets and create a new call_to_action.dart under the folder.
class CallToAction extends StatelessWidget {
final String title;
const CallToAction(this.title);
@override
Widget build(BuildContext context) {
return Container(
padding: const EdgeInsets.symmetric(horizontal: 60, vertical: 15),
child: Text(
title,
style: TextStyle(
fontSize: 18,
fontWeight: FontWeight.w800,
color: Colors.white,
),
),
decoration: BoxDecoration(
color: Color.fromARGB(255, 31, 229, 146),
borderRadius: BorderRadius.circular(5)),
);
}
}
Now, place in HomePage next to PageDetails. The final HomeView will look like the following code.
class HomePage extends StatelessWidget {
const HomePage({Key key}) : super(key: key);
@override
Widget build(BuildContext context) {
return Scaffold(
backgroundColor: Colors.white,
body: CentredPage(
child: Column(
children: <Widget>[
NavigationOption(),
Expanded(
child: Row(children: [
PageDetails(),
Expanded(
child: Center(
child: CallToAction('Join Us'),
),
)
]),
)
],
),
),
);
}
}
Your work is done and now when you run the code and see the changes the front page will look like the image shown earlier. The above Flutter layout is responsive and user-friendly, this will help you create a basic website.

No comments:
Post a Comment