How To Create Azure Functions? You can create projects with local C# functions using Azure Function in Visual Studio. The best part about using a serverless environment in Azure is it allows you to develop and deploy easily.
In this article, we have brought you steps to create your first C# function in Azure with Visual Studio. The in-process C# functions mentioned here are only compatible with Long Term Support (LTS).
In this article, we have brought you the following topics you will learn here.
Create a C# Function project using Visual Studio.
Build a function that responds to HTTP requests.
Verify your C# function by running your code locally.
Publish your code to Azure Functions.
Prerequisites
Install Visual Studio and ensure to choose Azure development workload while installing.
Get an Azure subscription by creating an account if you don’t already have one.
Step 1: Create a C# Function project using Visual Studio
Create a C# class library project with the help of a project template of Azure Function using Visual Studio which you can use for a function application in Azure. You can develop Azure function applications and it group functions in terms of the logical unit for deployment, scaling, sharing of resources, and easier management.
Start Visual Studio and click on File> New> Project.
Under ‘Create a new project’, in the search box type ‘Functions’, select the Azure Functions template, and click on ‘Next.’
Now go to the ‘Configure your new project’, enter the ‘Project Name’ of the project you are creating, and then click on ‘Next.’ Make sure to use a valid project name without using hyphens, nonalphanumeric characters, and underscores.
Now, in Additional information select from the below options for Function workers.

Source: learn.microsoft.com
The two process functions use separate APIs, plus each process model uses a separate template while generating the function project code. In case you don’t see many options for Dot NET 6.0 and later Dot NET runtime versions it means you are required to update your Azure Functions tools installation.
5. Use the below-given values for the remaining Additional information settings.

Source: learn.microsoft.com

Source: learn.microsoft.com
Make sure ‘Anonymous’ is selected for the ‘Authorization level.’ When requesting access to your function endpoint in Azure if you select the default level of Function, you must provide the function key.
6. To build the Azure function project and HTTP trigger function, choose ‘Create’.
For the HTTP trigger function type, Visual Studio generates a project and class that contain boilerplate code. The boilerplate code transmits an HTTP response that contains a value taken from the query string or request body. The HttpTrigger attribute indicates that an HTTP request will initiate the function. It will help you create an Azure function.
Rename the Function
You are not required to set the name, the ‘FunctionName’ method set the default name as Function1. Now that tooling does not allow you to override the default name of the function, you can create a better name for the function.
Go to File Explorer, right-click on the Function1.cs file, and rename the function to HttpExample.cs.
In your code, rename the function to HttpExample.
Name Run, in the HttpTrigger method, use HttpExample for the FunctionName method.
The function that you have just created should look like the following code:
In process
Isolated process
Step 2: Run your function locally
Integrate Azure Functions Core Tools with Visual Studio so that you can easily test functions locally with the help of full Azure Functions runtime.
In order to run your function, click on F5 in Visual Studio. Turn on the firewall exception that allows the tools to handle HTTP requests. You need not worry about the Authorization level while running your function locally.
Copy the URL of the function from the runtime output of Azure Functions.

Source: learn.microsoft.com
Put the HTTP request's URL in the address bar of your browser. Run the request after appending the query string ?name=YOUR NAME> to this URL. The response to the local GET request sent by the function is displayed in the browser in the following image:

Source: learn.microsoft.com
4. Press Shift+F5 in Visual Studio to halt debugging.
It's time to publish the project to Azure once you've made sure the function functions properly on your local machine.
Step 3: Public your project to Azure
Your local project can be published to Azure using Visual Studio. A function app must be included in your Azure subscription before you can publish your project. When you initially publish your project using Visual Studio publishing, if you don't already have a function app in Azure, one is automatically created for you. You create the Azure function app in Visual Studio and related Azure resources in this article.
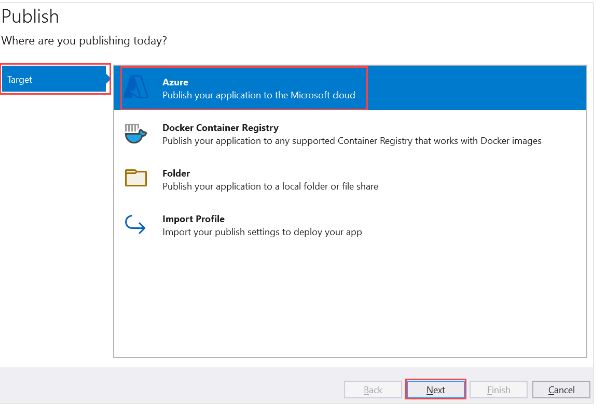
Under the ‘Solution Explorer’, right-click on the project and choose Publish. Under ‘Target’, choose Azure and then ‘Next.’
Source: learn.microsoft.com
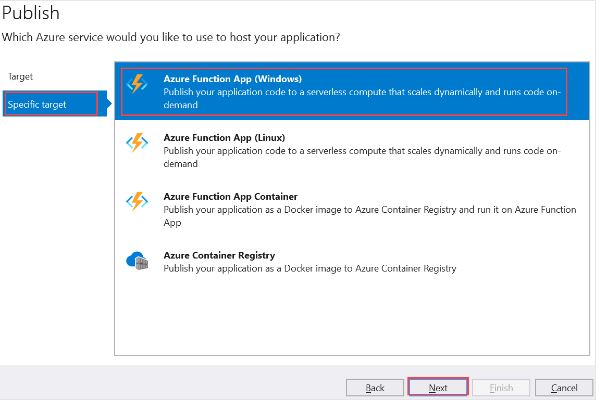
Choose Azure Function App (Windows) for the option ‘Specific Target’, which is responsible for creating Function App that runs on Windows, after that choose ‘Next.’
Source: learn.microsoft.com
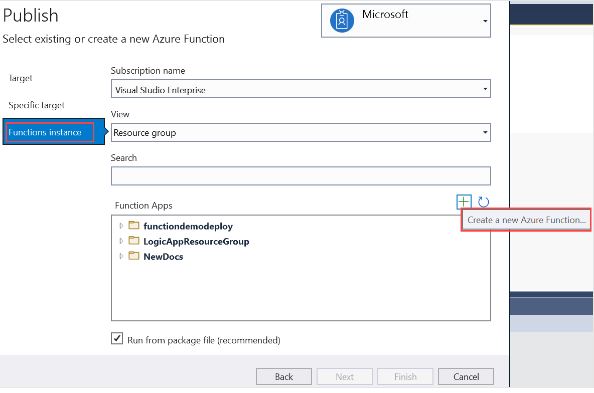
Under the ‘Function Instance’, select ‘Create a new Azure Function.’
Source: learn.microsoft.com
Use the following value specified to create a new instance.

Source: learn.microsoft.com

Source: learn.microsoft.com
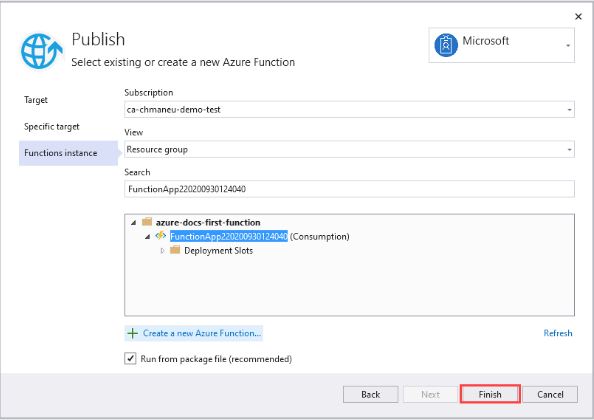
To develop a function app and the resources necessary for it in Azure, choose to Create. The lower-left corner of the window displays the status of resource production.
Make sure the Run from package file is selected in the Functions instance. Run-From-Package mode is enabled when using Zip Deploy to deploy your function app. The deployment strategy for your functions project that is advised for improved performance is Zip Deploy.
Source: learn.microsoft.com
The package containing your project files will be deployed to your new function app in Azure after you choose Finish and choose to Publish on the Publish page.
The root URL of the function app on Azure is displayed in the Publish tab once the deployment is finished.
Choose Open on the Azure portal under the Hosting part of the Publish menu. This brings up the Azure portal's new function app resource.

Source: learn.microsoft.com
Step 4: Verify the function in Azure
Select the new function app in Cloud Explorer. In case there is not, expand your subscription> ‘App Services’ and choose the new function.
Now, right-click on the function application and select ‘Open in Browser.’ This enables the root of the function application in your default browser and displays the page that represents the function application is running.
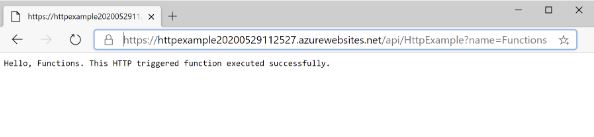
Append the string /api/HttpExample? name_Functions to the base URL and run your application in the address bar of the web browser.
You will see the URL which calls HTTP trigger function in the below format.
http://<APP_NAME>.azurewebsites.net/api/HttpExample?name=Functions
Visit this URL to view the browser's response to the remote GET request that the function returned, which appears in the following example:
Source: learn.microsoft.com

No comments:
Post a Comment