Creating an app with an online database has become easy and simple over the last few years. You can easily set up a Firebase real-time database by creating a new project in Firebase. The following steps will help you to set up the Firebase database for ASP.NET MVC application. These steps will help you integrate Firebase in ASP NET Core MVC.
Step 1: Create a new Firebase project
Visit Firebase and create your account with your Google Account.
Click on Get Started and select Add Project.
Name the project ‘FirebaseMVCSample’ and click on Create Project.
Click on the Continue button and it will navigate you to the Firebase console dashboard.
On the left-hand side of the menu, expand the Develop option and choose Database. Scroll down and click on Create Database.
Then choose Start in Test Mode and click on the Enable button.

Step 2: Create ASP.NET MVC app with Firebase
Install Visual Studio 2019 in your system and open it.
Select the option Create a New Project.
After that select ‘ASP.NET MVC Web Application’ and name the project ‘FirebaseMVCApp.’
Note: Make sure to choose .NET Framework 4.7.2 and then click on the select button.
Choose MVC, leave every option to default, and click on the Create button to create a database for web applications.
Now create an object that will describe the data that will be saved in your Firebase database.
Go to the Model folder and right-click on it.
Add a new class ‘LoginData.cs.’
Add a library that will handle all the database access. You need to right-click on the new project you just created and choose Manage Nuget Packages. Use Firebase with Your ASP.NET MVC App by installing the below-given library:
Now open the Controller which is HomeController and add all the references given below.
Next, you need to replace the code of AboutFunction with the following code, and change the URL of FirebaseClient to the new and unique URL of your Firebase project.
Now, change the Views folder code in the About.cshtml with the following code.
Now, that you have successfully replaced code in the View folder, its time to build and launch your MVC web application in your browser. Ensure that you keep a tab open to the Firebase console on your app’s Realtime Database page. Now, click on your About navigation link.
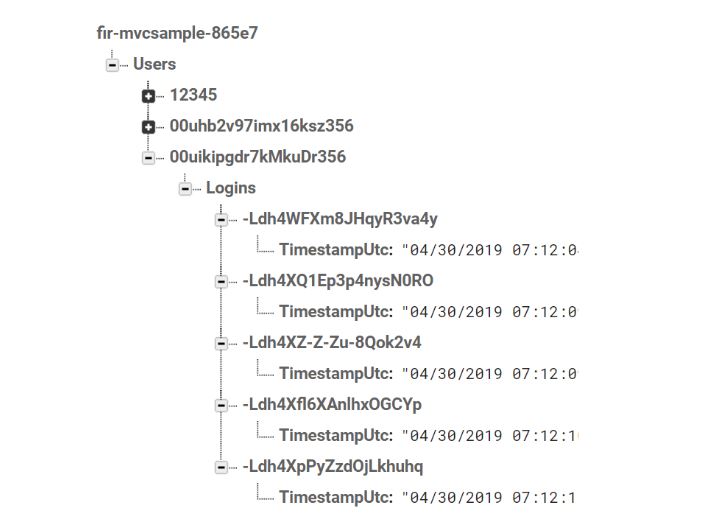
Next, navigate to the Firebase console tab and expand the nodes and look at how JSON format style data is saved. Keep in mind that the timestamp is included within a session node that was produced at random. The FirebaseDatabase library's PostAsync method for the last child object already includes that.

When you go to the Home page and then from there to the About page, you would be able to see an additional entry in the view as well as the database.

Step 3: Set up secure User Authentication
This will help you get the user authentication by generating your user IDs and then insert them into the database. However, using a third-party authorization provider is a secure process to enable users to control their own data while you can concentrate on creating your own business.
We can take Okta here as an example that provides different hosting plans for user-identification data and helps you handle the login process for you. You can create your account with Okta and set up a secure user-authentication ID for your app.
Navigate to the Users tab and tap on Add Person. Next, you need to fill out the details in the form for a sample user and make sure that you change the Password drop-down menu to ‘Set by Admin’. Now fill in a temporary password and click on the ‘save’ button.
Make other changes as the following in the settings to get things done first. After all the setup and changes are done, click on the save button to save all the changes.

Step 4: Add User Authentication to your ASP.NET MVC App
In step 3 we have made a user Id set up with Okta hosting and hence here we will enable Okta to generate the object that will provide you the ID to pass to Firebase in order to save additional changes.
Properties can be chosen by right-clicking the project. Go to the Web tab and modify the project's URL (https://localhost:8080) to reflect the application settings in Okta's portal. Next, choose Manage NuGet Packages by performing right-clicking on the project. Set up the aforementioned libraries:
Next, you need to add the account you generated with Okta to your Web.config file which is present under the appSetting section. Replace the code in the Okta client ID with your own Okta credentials that you generated in the portal.
Next, right-click on your project and choose Add OWIN Startup class. Name it ‘Startup’ and then tap on the Ok button. Now, add the below-given command to your using sections.
After that, replace the code of the Configuration() method with the following code.
After this we need to indicate where you can get your user Id from. Now you need to open your Global.asax.cs file. The below command you need to add to the Using sections.
Replace the code of the Application_Start() method with the following code in order to match the claim type “name” here which is present in the JSONWebToken that you have received from the Okta in order to set your user’s identifier.
Navigate to Shared/View and click _Layout.cshtml. After <ul> list of ActionLinks, you need to add the code in order to display the user’s name and switch the Login/Logout link button.
For Login and Logout functionality, add MVC 5 empty controller named as ‘AccountController’ by right-clicking on the Controller option. In the Using section, add the below references.
Add the below code to the AccountController class in order to handle Action Results.
Add the Authorize property to the About ActionResult at the top of the HomeController by opening it. This will guarantee that function can only be accessible by authenticated users and lead unauthenticated users to the Okta login process.
All you need to do to configure user login so that it goes to Okta and then returns to your app is that. Finally, you can update your About method, retrieve the Firebase unique identification using the user claims provided by Okta, and change the current user's email.
In your Usings section, include the following citation:
Remember to modify the FirebaseClient to your specific Firebase project URL during instantiation and replace your About function with the code below to complete this.
Select About. The user should be forwarded to your login page that is hosted by Okta. If this is the user's first time logging in, you may need to update your password after signing in as them.
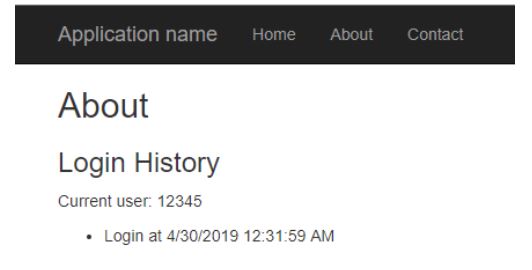
The last login time for your authenticated user should be presented on the About page of your ASP.NET MVC application after authentication, which should lead you back there. If you would want to generate more, simply click the About navigation link a few more times. The option to log out is now available, and you can see the user's name as it has been allocated to the Principal Identity in the navigation bar.
Go to your database by logging into your Firebase console. Observe that the Okta user ID from the Principal Identity claims that Okta gave to it now fills out the user ID field instead of being manually entered. It will immediately construct the data node for them in Firebase without you having to make a different call to generate it if you log out and log back in as a completely different user.

No comments:
Post a Comment